

 With most Microsoft Windows Operating Systems, when adding additional hard disks, we are familiar with creating new partitions as drive letters. Another option exist that can add the new partition as a folder, eliminating the use of drive letters…
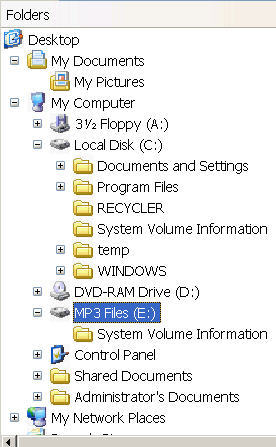
Using empty folders (on partitions formated as NTFS) instead of a drive letter allows the new partition to appear as part of the C:\ drive. An example of this is shown below. With the partition created normally as the drive letter MP3 Files (E:) on the left. And with the partition created as a folder under the C drive as MP3 Files on the right.

A partition can be mounted as an empty NTFS folder either by adding a new hard disk to your computer or if your existing disk has an unused partition available, and following the steps below:
- Click on Start / Run… and type diskmgmt.msc (opens Disk Administrator)
- Right click on the new partition and select New Partition
- Follow the instructions until you reach Assign Drive Letter or Path section
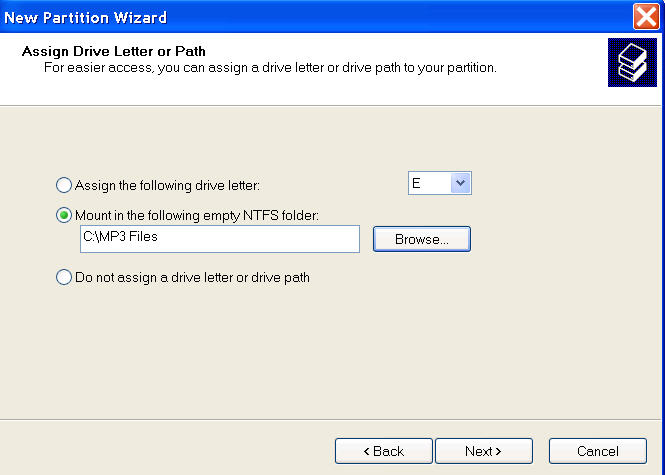
- Select Mount in the following empty NTFS folder radio button and select Browse…
- Highlight the C: drive and click on New Folder and name the new folder
- Complete the wizard
A mounted folder can also be changed back to a drive letter at any time from Disk Administrator (diskmgmt.msc) by right clicking on the Partition and selecting Change Drive Letters and Paths… and click the Add… button then selecting an available drive letter. The data on the drive will not be deleted. (Note: you can also change it to another empty NTFS folder).
Comments on How To Mount New Partitions As Folders In Windows
In that case the dialog box is very small and you cannot resize it ; so when you have done multiple mounts on deep trees you don't see anything and have to copy / paste the entries in a text editor to see them.
Is there a command runnable in a console window enabling us to perform these mounts / unmounts / displays ?