

 If you spend anytime using Windows Command prompt, one thing is for sure, it has the same look since the DOS days. While Windows itself can be customized in many ways to your preference, few changes can be made to the Command prompt. Changing font selection is limited to only two choices, Raster or Lucida and there is no method to add different fonts in the properties window for the Command prompt. Fortunately you can add fonts using the registry.
Before additional fonts can be added, Microsoft criteria for which fonts can be used follows:
• The font must be a fixed-pitch font.
• The font cannot be an italic font or have a negative A or C space.
• For TrueType fonts, it must be FF_MODERN.
• If it is not a TrueType font, it must be OEM_CHARSET.
With all that being said, to add fonts, open the registry by going to Start \ Run and type regedit in the Open field and navigate to:
HKLM\Software\Microsoft\WindowsNT\CurrentVersion\Console\TrueTypeFont
Before Proceeding - the next step includes exporting the registry key to use as a backup if needed. DO NOT SKIP THIS STEP. As a safe guard, you may want to create a System Restore point when making configuration changes to your System.
Right click on TrueTypeFont and select Export to back up the Key to a location on your Computer (you may also want to copy to a CD or USB drive that can be accessed if needed).
(NOTE: screen shots are from Vista, but XP will look similar)

To add additional fonts, you will need to append each font String Value name with an additional "0". Since "Lucida Console" is the first font and is "0", the next font added will be named "00", with the next font added will be "000" and so on.
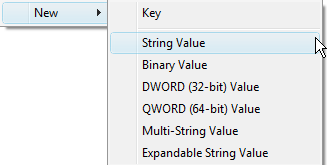
Now click on the TrueTypeFont key and in the right window pane, right click and select:
New \ String Value
Then enter 00 for the Value Name field. Next, double click on the new String Value (00) you just created, and enter the font name in the Value Data field. Add any additional fonts following the same steps as above. In the screen shot below I added two fonts named 00 for Courier New and 000 for Consolas

Exit the registry and reboot. After restart, open the Command prompt by going to Start \ Run and type cmd.exe in the Open field. Then right click on the title bar and select Properties and click on the Fonts tab.

You should see the fonts you added and select in the font section. Choose one and click OK. Make any adjustments by returning to the Fonts tab and selecting a different size if necessary.
Comments on How To Add and Change Fonts In Windows Command Prompt
Thank you. Very helpful
Works great!
Nice trick, it worked like a charme. Didn't even have to reboot to see the new fonts in the picker.
Westminster font does not work, Why!?!?!
From what I can tell, Westminster is _not_ a fixed-pitch font.
http://www.thescifiworld.net/fonts.htm
i want a few of these fonts on there.
Mostly: ancient hand, ancient virtual,anquietus, or times new ancient
will any of these work?
also, even before i changed anything, when i went into the properties in command prompt, it pops up with a dialog box, that says font size should be between 5-72. but even if i put one, and save it, it pops up every time. any idea on how to fix that?
and with the last comment/question, any way to make the fonts i want to work? editing wise, if they wont work.
Thanks for instructions! Works great! My fav type is 'Droid Sans Mono Dotted'.
I am using FireCMD - http://www.brainasoft.com/firecmd/ . It easily allows to change cmd.exe properties like font family, color and size, window size etc. Moreover it also allows to copy/paste and select text easily unlike command prompt.
@Sam: "brainasoft" ?  😛 Someone there (everyone ?) actually thought that was a good company name to pick ?  Their brains must be going soft (see ? ☺).